www.inkydoodles.co.uk, site logo.
Follow us on Facebook

find us on facebook

All major debit / credit cards accepted (via Paypal secure website), or by your PayPal Account.

New side column

Cheque payments also accepted.

  • PayPal
  • Mastercard
  • Maestro
  • Visa
  • Visa Electron
Powered By Paypal
Mailing List

Subscribe to our mailing list

* indicates required

Shopping Basket

You currently have no items in your basket.

Shop Search

Blog

Hi, Sarah here.

I want to use the blog to let you know about what's going on at Inky Doodles, in my head and in the wider world of stamping and papercraft so that you too can be inspired and create something amazing!

find us on facebook


With the help of the wonderful Caroline Shinnie I hope to be able to show a card or project with instructions most days.

 RSS Feed

» Listings for February 2014

  1.  
    Stamps used 
     
    Ink pads used 
     
    Stencils/masks used 
     
    Other products


    How to make

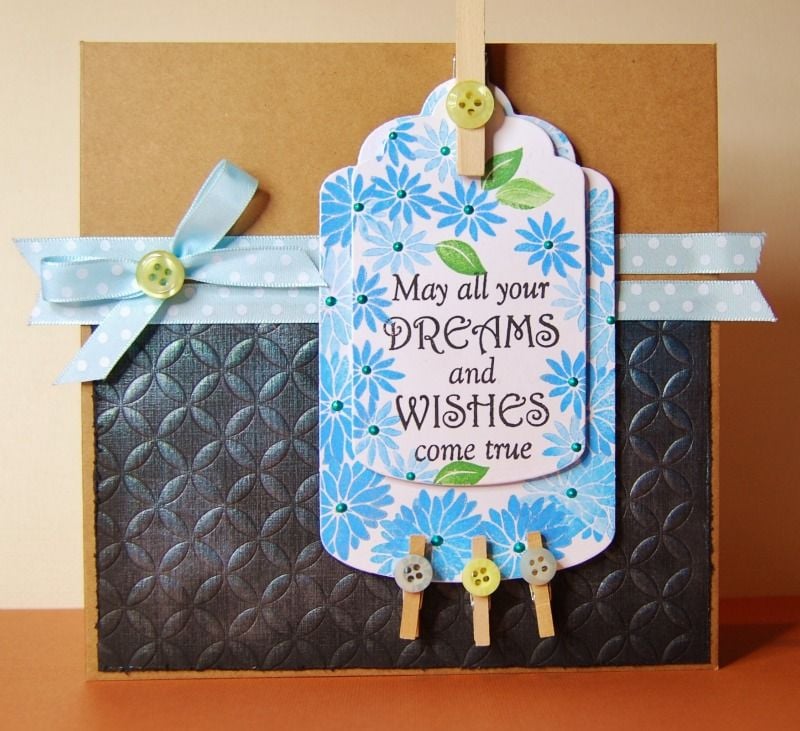
    Take a piece of black card and trim so that it covers two thirds of your square card blank. Emboss with the Quattro Mask using your die cutting machine then rub over it lightly with the Pearlescent Sky Blue ink pad to highlight the raised pattern. Distress the edges with scissors (run the blade carefully along the edge several times to rough it up), and then adhere it to a card blank. Cover the join with ribbons, and add a bow with a button.

    For the tag embellishment, take two sizes of white tag, and stamp the sentiment on the top one using the Black Versafine ink pad. Using Pearlescent Sky Blue Ink, stamp the flowers from the Dandelion Dreams set, randomly around the tags. Add a few leaves in Pearlescent Thyme and then add peacock liquid pearls to the flower centres. To finish off, add a few wooden pegs and buttons.

  2.  

     Products used


    A6 Flutterby stamp set


    Brilliance inkpad - Pearlescent Lavender


    Liquid Pearls - White Opal


    MDF Flutterby Shapes


    Acrylic paint, beads, buttons and thread

    How to make

    Firstly paint one large butterfly, two small butterflies and one of the flower shapes from the MDF kit in white acrylic paint.  When dry stamp the butterflies on both sides with the matching stamps from the Flutterby stamp set with the Pearlescent Lavender inkpad. Stamp the small flower using either of the flower shapes that fit.  Leave to dry or heat set if you're impatient, then add liquid pearls to the centres of the flowers.  Once dry string the shapes together with thread or Bakers twine adding buttons and little bows.  Add some beads to the strings on the bottom butterfly.  Beautiful and very easy!

  3.  
     Stamps Used


    Ink pads Used 
     
     
    Other supplies 
     
    Clear embossing powder
    Adhesive gems, 
    Wire for antennae (bend with small pliers)
    Plain white card tag (you can make your own by using a rectangle with the top two corners sliced off and a hole punched in the middle at the top)
    Scrap of coordinating ribbon
    Die cut scrolls, leaves or flourishes 
     
    butterfly blog 1
    butterfly blog 3 butterfly blog 2
     

    How to Make

    Take a plain white tag, and swipe the Olive Brilliance Ink pad across it several times to give a patchy background. Then, stamp over this base with the different flower heads from the Dandelion Dreams set using the Olive and Silver Brilliance ink pads. Randomly stamp the Medieval background using black Versafine ink, without using an acrylic block, so that you get little patches of the pattern. Quickly cover it with clear embossing powder and heat set. Afterwards, add the Black Soot Distress ink around the edges with an Ink Duster or Cut and Dry foam.

    To make the butterfly embellishments, randomly stamp a piece of scrap card with the solid flower stamps from the Dandelion Dreams set using the colours Victorian Velvet and Olive. When this is dry, stamp the butterfly outline from the Flutterby set in Black Versafine over it and cut out. For the body of the Butterfly, make a paper bead from a long triangular strip of lightweight card stamped with the Medieval background and then rolled into a bead shape. Try experimenting with different widths and lengths of card for different effects. Add jewels to the centre of the flowers on the butterfly wings and attach the wire antennae into the centre of the rolled bead before attaching to the butterflies. Stick the butterflies to the tag, with some die cut scrolls or flourishes, and to finish it off, add a ribbon. Use as a tag or attach to the front of a card.