www.inkydoodles.co.uk, site logo.
Follow us on Facebook

find us on facebook

All major debit / credit cards accepted (via Paypal secure website), or by your PayPal Account.

New side column

Cheque payments also accepted.

  • PayPal
  • Mastercard
  • Maestro
  • Visa
  • Visa Electron
Powered By Paypal
Mailing List

Subscribe to our mailing list

* indicates required

Shopping Basket

You currently have no items in your basket.

Shop Search

Blog

Hi, Sarah here.

I want to use the blog to let you know about what's going on at Inky Doodles, in my head and in the wider world of stamping and papercraft so that you too can be inspired and create something amazing!

find us on facebook


With the help of the wonderful Caroline Shinnie I hope to be able to show a card or project with instructions most days.

 RSS Feed

Category: butterflies

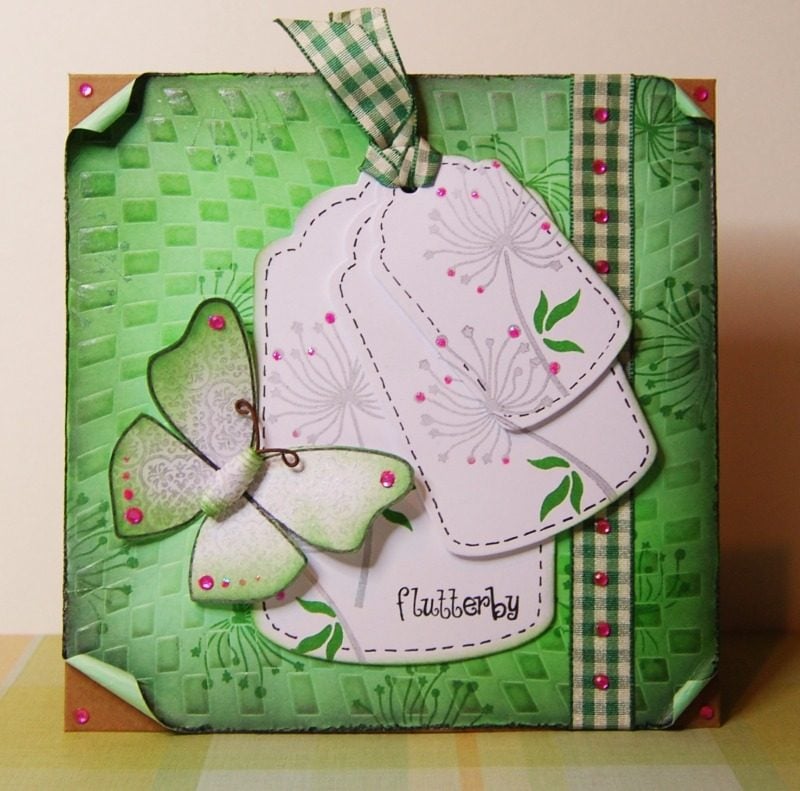
  1. Green butterfly tag card by Caroline Shinnie

    Posted on

     
    Stamps Used


    Ink Pads used


    Mask
     
     
    To make the background, emboss the Twisted Check Mask through your die cutting machine, using pale green card. Distress the edges with scissors, and then use Mowed Lawn and Black Soot Distress ink to bring out the Embossing. Stamp the flower head (from the Dandelion Dreams set) randomly over the embossed card using Brilliance Pearlescent Thyme . Curl all four corners in slightly, and stick it to a blank 6x6 Kraft card. 
     
    For the toppers, decorate 3 different sized white tags with flower stamps using Starlite Silver and Pearlescent Thyme for the leaves. Add glam pink stickles to the flower heads. To make the butterfly, stamp a piece of card using the Medieval Background in Starlite Silver. Then stamp the butterfly outline from the Flutterby set with Black Versafine and cut it out. Make a matching paper bead for the butterfly body from a strip of the card, stamped in the Medieval Background. Distress the edges of the Butterfly with Mowed Lawn distress ink and embellish with a few jewels. Finally attach to the card and add ribbon.


  2. Medieval Jewel Card by Caroline Shinnie

    Posted on


    Stamps used

    Medieval Background

    Flutterby

     
    Ink pads used
     
    Memento - Tuxedo Black
    Distress inks - Mowed Lawn & Peacock Feathers
     
    For the background, use the Medieval stamp in Black Memento on white card and cut it out. Then distress the edges with Peacock feathers. Randomly colour in some parts of the stamp using Soft green, Meadow green and Denim Blue Promarkers. Stick this to a Black card blank. For the Butterflies, stamp another piece of white card with Black Memento, and then stamp the Butterfly using a clear inkpad and green embossing powder, and then cut it out. Distress the edges of the Butterflies, with Mowed Lawn and Peacock feathers, and add Jewels to decorate. To make the Butterfly bodies, make paper beads out of Medieval stamped card. Curve the wings and stick to the card using 3D silicone glue. To finish off, tie a piece of ribbon to the bottom of the card with a jewel brad in the centre.


  3. Flutterby Hanger by Caroline Shinnie

    Posted on


     Products used


    A6 Flutterby stamp set


    Brilliance inkpad - Pearlescent Lavender


    Liquid Pearls - White Opal


    MDF Flutterby Shapes


    Acrylic paint, beads, buttons and thread

    How to make

    Firstly paint one large butterfly, two small butterflies and one of the flower shapes from the MDF kit in white acrylic paint.  When dry stamp the butterflies on both sides with the matching stamps from the Flutterby stamp set with the Pearlescent Lavender inkpad. Stamp the small flower using either of the flower shapes that fit.  Leave to dry or heat set if you're impatient, then add liquid pearls to the centres of the flowers.  Once dry string the shapes together with thread or Bakers twine adding buttons and little bows.  Add some beads to the strings on the bottom butterfly.  Beautiful and very easy!